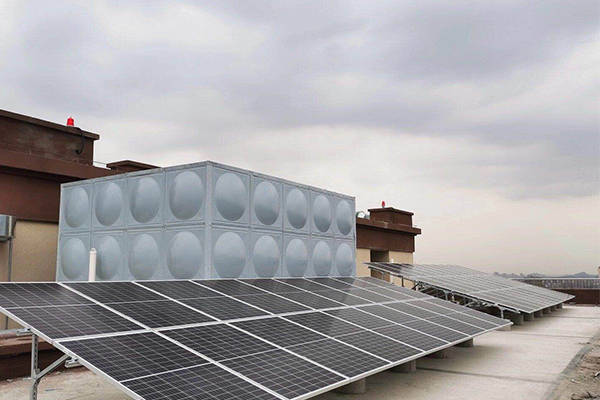
Solar panel mounting systems for flat roofs are specialized structures designed to secure photovoltaic (PV) panels on low-slope or flat roofing surfaces, unlocking the energy-generating potential of commercial buildings, residential homes, and industrial facilities. Unlike sloped roof systems that leverage natural incline, flat roof mounts address unique challenges—such as water drainage, wind resistance, and optimal sun exposure—to ensure efficient, long-lasting solar operations.
The primary types of flat roof mounting systems cater to diverse needs. Ballasted systems, the most common, use weighted blocks (concrete or recycled materials) to anchor panels without penetrating the roof membrane, preserving waterproofing. Penetrating systems, ideal for high-wind areas, use fasteners to attach to the roof’s structural deck, offering superior stability with proper sealing to prevent leaks. Adhesive systems, a lightweight option, rely on industrial-strength adhesives to bond mounts to the roof, suitable for roofs with weight restrictions.
Key advantages of these systems include flexible layout—panels can be angled (typically 10–30°) to match local latitude, maximizing sunlight absorption—and space efficiency, as flat roofs often have unobstructed areas for large-scale installations. They also support easy maintenance: technicians can access panels without damaging the roof, and modular designs allow for future expansions.
Critical design considerations include roof load capacity (to accommodate mounts, panels, and ballast), waterproofing compatibility (using roof-friendly materials to avoid membrane damage), and wind load resistance (engineered to withstand local weather conditions). Many modern systems also integrate cable management and drainage features to enhance functionality.
As global demand for distributed solar energy grows, flat roof mounting systems play a pivotal role in urban renewable energy adoption. They enable businesses to reduce electricity costs, meet sustainability goals, and qualify for green energy incentives. For homeowners, they transform underutilized roof space into clean energy sources. With ongoing innovations in lightweight materials and modular designs, these systems continue to become more accessible, making flat roofs a vital asset in the transition to a low-carbon future.
Blog
-
Eliminate Odors, Optimize Production: The Indispensable Deodorizer for Injection Molding
In the injection molding process, heating and melting of plastics (such as PP, ABS, PVC, and engineering resins) often release pungent volatile organic compounds (VOCs), smoke, and unpleasant odors. These emissions not only irritate workers’ respiratory systems and affect workplace comfort but also risk violating environmental regulations like EPA or REACH standards. As environmental awareness and occupational health requirements rise, a high-performance deodorizer has become a must-have piece of equipment for modern injection molding factories.
A specialized deodorizer for injection molding targets the root of odor issues through advanced purification technologies. Most models integrate multi-stage filtration: initial filters capture large particles and smoke, activated carbon or molecular sieve layers adsorb harmful VOCs and odor molecules, and some high-end versions add catalytic oxidation modules to decompose pollutants into harmless CO₂ and water. This multi-pronged approach ensures efficient removal of over 95% of odors and toxic gases, maintaining fresh air in the production area.
What makes these deodorizers indispensable for injection molding? First, they are designed for industry-specific needs—compact structures fit seamlessly into workshop layouts, and adjustable air volume adapts to different machine sizes and production loads. Second, they offer cost-effective operation: low energy consumption, long-lasting filter elements, and easy maintenance reduce operational costs. Third, compliance support: by meeting strict environmental and occupational health standards, they help factories avoid fines and build a responsible corporate image.
Beyond odor elimination, these devices bring tangible benefits: improved employee well-being boosts productivity and reduces absenteeism; a clean, odor-free environment enhances customer trust during factory visits; and reduced pollutant emissions align with sustainable manufacturing trends. Whether for small-batch workshops or large-scale production lines, a tailored deodorizer not only solves odor troubles but also elevates the overall operational quality of injection molding facilities.
Investing in a high-quality deodorizer is not just a compliance measure but a strategic move to optimize production conditions and protect human health. For injection molding enterprises aiming for efficiency, safety, and sustainability, this equipment is an essential investment that delivers long-term returns.
-
Rubber Deodorant: The Key to Odor-Free Rubber Products
Rubber products are ubiquitous in daily life and industrial settings, from car tires and household gloves to industrial seals and sports equipment. However, a common drawback of rubber items is the unpleasant odor they often emit, which stems from volatile organic compounds (VOCs) released by rubber polymers, vulcanization agents, plasticizers, and other additives during production and use. This odor not only affects user experience but may also cause discomfort to sensitive individuals. Rubber deodorant emerges as a practical solution to this problem, effectively eliminating or reducing unwanted smells while preserving the performance of rubber materials.
The working principle of rubber deodorant varies based on its composition. Adsorptive deodorants, typically containing activated carbon or zeolite, trap odor molecules through porous structures, preventing their release into the air. Chemical neutralizing deodorants react with VOCs and sulfur-containing compounds—major odor sources—to form non-volatile, odorless substances. Additionally, biological deodorants use enzymes or microorganisms to break down odor-causing molecules, offering an eco-friendly alternative. These mechanisms ensure targeted odor elimination without altering the rubber’s elasticity, durability, or structural integrity.
Rubber deodorant finds applications across numerous industries. In the automotive sector, it is added to tires, door seals, and dashboard materials to reduce interior odors. For household products, it enhances the usability of rubber gloves, yoga mats, and kitchen utensils by eliminating lingering smells. In industrial settings, it improves workplace air quality by treating rubber hoses, conveyor belts, and gaskets. Even in medical devices, such as rubber catheters and gloves, hypoallergenic deodorants ensure patient comfort without compromising safety.
When selecting a rubber deodorant, key factors include compatibility with the rubber type, odor-removal efficiency, and environmental friendliness. High-quality deodorants are non-toxic, non-corrosive, and comply with international safety standards. As consumer demand for odor-free and eco-friendly products grows, manufacturers are developing advanced formulas that offer long-lasting effects while minimizing environmental impact.
In conclusion, rubber deodorant plays a vital role in enhancing the functionality and user experience of rubber products. By addressing the root cause of rubber odors, it bridges the gap between performance and comfort across various sectors. As technology advances, rubber deodorants will continue to evolve, providing more efficient and sustainable solutions for a odor-free future.
-
Common Camlock Coupling Mistakes & How to Avoid Them
Camlock couplings are famously reliable, but even the best equipment can fail if used incorrectly. These common mistakes lead to downtime, product loss, safety incidents, and unnecessary costs. Learn how to identify and avoid these pitfalls to ensure your operations run smoothly and safely.
Mistake #1: Mismatching Coupling Types
-
The Error: Trying to connect two male (Type A) or two female (Type B) ends, or using incompatible adapter types.
-
The Risk: It won’t seal, causing immediate and catastrophic leaks. It can also damage the coupling lugs and grooves.
-
The Solution: Remember the golden rule: Type A (Male) always connects to Type B (Female). Double-check the types before connection.
Mistake #2: Ignoring Chemical Compatibility
-
The Error: Using an aluminum or polypropylene coupling with a chemically aggressive fluid it can’t handle.
-
The Risk: Rapid corrosion, degradation, coupling failure, fluid contamination, and dangerous spills.
-
The Solution: Always consult a chemical compatibility chart before selecting your coupling material. When unsure, opt for 316 stainless steel.
Mistake #3: Connecting or Disconnecting Under Pressure
-
The Error: Failing to fully depressurize the system before attempting to disconnect the coupling.
-
The Risk: The coupling can violently separate, turning the pressurized fluid into a dangerous projectile, causing whipping hoses, injuries, and spills.
-
The Solution: Always depressurize and drain the line before disconnecting. Make this a non-negotiable safety protocol.
Mistake #4: Incomplete Locking
-
The Error: Not pulling the cam arms down fully into the locked position.
-
The Risk: The coupling may hold initially but can blow apart under pressure, causing a sudden leak or failure.
-
The Solution: After connection, always verify the cam arms are fully down and perform a tug test. You should feel a positive lock.
Mistake #5: Using Damaged or Worn-Out Couplings
-
The Error: Continuing to use couplings with damaged cam arms, cracked bodies, worn-out threads, or missing O-rings.
-
The Risk: A single damaged component compromises the entire coupling’s integrity, leading to leaks and failures.
-
The Solution: Implement a regular inspection schedule. Replace worn O-rings, damaged dust plugs, and any coupling that shows signs of excessive wear or cracks.
Mistake #6: Mixing and Matching Standards
-
The Error: Assuming all “Camlock” couplings from different brands or countries are identical.
-
The Risk: While many are interchangeable, slight variations in dimensions between standards (e.g., ISO vs. AAR) can lead to poor seals, leaks, and difficulty connecting.
-
The Solution: Specify the standard you need (e.g., ISO 2852) when ordering and try to stick to one standard within your operation.
Mistake #7: Neglecting the O-Ring
-
The Error: Forgetting that the O-ring is a critical sealing component and not specifying the right material for the fluid.
-
The Risk: A standard Buna-N O-ring will swell and fail if used with gasoline, just as an EPDM O-ring will fail with petroleum oils.
-
The Solution: Specify the O-ring material when ordering. Keep a stock of common replacement O-rings (Buna-N, Viton®, EPDM) and replace them during maintenance.
Avoid Costly Downtime. Shop our online store for replacement parts, O-ring kits, and high-quality Camlock couplings designed to prevent these common errors.
-
-
Low Volatility Deodorizing Agents: Long-Lasting, Low-Irritation Solutions for Odor Control
Unpleasant odors—from household waste, pet dander, industrial emissions, or public spaces—disrupt comfort and pose hidden risks, as many traditional deodorizers rely on high-volatility compounds that fade quickly or irritate skin/respiratory systems. Low volatility deodorizing agents (LVDAs) address these flaws, emerging as a game-changer in odor management by balancing long-lasting efficacy with minimal environmental and health impacts.At their core, LVDAs work by slowing the release of active odor-neutralizing components—unlike high-volatility alternatives that evaporate rapidly. These active ingredients vary by use case: plant-derived extracts (e.g., tea polyphenols, citrus terpenes) bind to odor molecules (such as ammonia or hydrogen sulfide) to break them down; microbial enzymes accelerate the decomposition of organic odor sources; and synthetic (slow-release) compounds form a stable film that gradually interacts with unwanted scents. Their low volatility ensures the active components stay concentrated at the odor source for 24–48 hours, rather than dispersing into the air within hours.Compared to conventional deodorizers, LVDAs offer three key advantages. First, their extended efficacy reduces the need for frequent reapplication—critical for high-traffic areas like hotels, garbage disposal sites, or pet shelters. Second, their low evaporation rate minimizes airborne irritants, making them safe for sensitive groups (e.g., children, allergy sufferers) and enclosed spaces (e.g., cars, offices). Third, many LVDAs use biodegradable active ingredients and non-toxic carriers, aligning with eco-friendly trends unlike chemical-heavy, high-volatility products that may contaminate air or water.LVDAs find applications across sectors. In households, they are added to laundry detergents, carpet cleaners, and pet litter to target persistent odors. In industry, they are integrated into wastewater treatment plants and food processing facilities to mitigate industrial fume odors. In public spaces, they are used in air fresheners and restroom cleaners that require long-term odor control without harsh fumes.As demand for safe, sustainable odor solutions grows, LVDAs are evolving—with innovations like smart-release formulas that adjust efficacy based on odor concentration, and plant-based blends that enhance biodegradability. In short, LVDAs are not just deodorizers; they represent a shift toward smarter, gentler odor management that prioritizes both performance and well-being. -
How to Connect and Disconnect Camlock Couplings Safely
Camlock couplings are designed for safety and efficiency, but only when used correctly. Improper operation can lead to sudden releases, spills, and workplace injuries. This step-by-step guide will ensure you and your team handle Camlock couplings safely every time.
Before You Begin: Essential Safety Precautions
-
Personal Protective Equipment (PPE): Always wear appropriate PPE, including safety glasses, gloves, and chemical-resistant clothing if handling hazardous media.
-
Depressurize the Line: Before connecting or disconnecting, ensure the system is fully depressurized and the line is drained if possible.
-
Inspect the Coupling: Check for damage, worn cam arms, cracks, or a damaged/missing O-ring. Never use a defective coupling.
-
Check Compatibility: Ensure the two couplers are designed to connect (e.g., Type A to Type B) and are made of compatible materials for the fluid.
How to CONNECT a Camlock Coupling: A Step-by-Step Guide
Step 1: Align
Hold the Type A (Male) Adapter and the Type B (Female) Coupler straight and align them. Ensure the lugs on the male end line up with the openings on the female coupler.Step 2: Insert
Push the male adapter fully into the female coupler until it seats completely. The base of the male adapter should be flush against the face of the female coupler.Step 3: Lock
Grab the cam arms (levers) on the female coupler’s collar. Pull them down firmly until they are in the fully locked position. You should hear or feel a distinct “click” or positive lock.Step 4: Verify
After locking, perform a tug test. Gently try to pull the two halves apart to confirm they are securely locked. Slowly introduce pressure to the system and check for any leaks.(Image/Video Suggestion: A short GIF or video showing the smooth motion of insertion and locking would be highly effective here.)
How to DISCONNECT a Camlock Coupling: A Step-by-Step Guide
Step 1: Depressurize and Drain
This is the most critical safety step. Fully depressurize the system and drain any residual fluid from the line. Be aware that fluid may be released during disconnection.Step 2: Unlock
Lift the cam arms on the female coupler to their fully upright and unlocked position.Step 3: Separate
Pull the two halves straight apart. If they are stuck, do not use excessive force. Check that the system is fully depressurized and that the cam arms are completely unlocked.Step 4: Cap (If not in use)
Immediately cap open ends with Type M (Blanking Plugs) and Type DP (Dust Plugs) to prevent contamination and damage.What NEVER to Do
-
NEVER try to connect or disconnect under pressure.
-
NEVER use a hammer, pipe, or other tool for extra leverage on the cam arms.
-
NEVER modify, weld, or alter a coupling.
-
NEVER force a connection if the halves don’t align easily.
-


